或许是最近飘了,想开始学习内核了,看到《庖丁解牛linux内核》这本书之后,萌发了一个调试内核的想法,所以这个系列应运而生,在最开始学习计算机的时候,都是从写Hello World!开始的,所以当我开始内核的时候,也想着延续这个传统(其实的听到xuanxuan老师讲到的😀),这篇文章是我第一次接触内核所写的文章,其实一直以来我都在好奇,如此庞大的操作系统到底是怎么启动起来的,本文旨在通过调试从start_kernelinit进程启动的过程来了解linux到底是怎么样启动起来的,如果你也想知道这个问题的答案,那就跟我看下去吧!

搭建环境

要想调试首先就得有一个linux来调对不对,先搭建一个简单的linux内核,通过编译内核代码加上根文件系统来构建一个简单的操作系统,先去下载linux内核源码,虚拟机的网络(可能是源的问题吧)实在不太行,下载完成之后千万千万要注意不要在windows下面解压,因为在linux源码里面有个文件叫aux.c,这玩意和windows下的设备名为同一个名字,解压出来之后,会删除不了此文件,如果真的一不小心解压出来了,下面为解决办法,解铃还需系铃人啊!:

win10系统下aux.c、aux.h格式文件无法删除的解决方法

1
2
3
4
5
6
7
8
mkdir kernel
cd kernel
#把linux源码放进kernel文件夹
xz -d linux-3.18.6.tar.xz
tar -xvf linux-3.18.6.tar
cd linux-3.18.6
make i386_defconfig
make

开始make之后,又报错下面两条错,原因很明显就是确实有个文件,在github中找到其他人的文件放到它提示的目录中就能开始编译啦!(你也可能不缺,具体看系统的内核版本)

compiler-gcc

1
2
3
include/linux/compiler-gcc.h:106:1: fatal error: linux/compiler-gcc9.h: 没有那个文件或目录

include/linux/compiler-gcc9.h:1:10: fatal error: linux/compiler-gccN.h: 没有那个文件或目录

make是个漫长的过程,需要静静等待….

编译完成之后就是搭建根文件系统:

1
2
3
4
5
6
7
8
cd ..	#退出到kernel目录
mkdir rootfs
git clone https://github.com/mengning/menu.git #把menuOS的源码拉下来
cd menu
gcc -o init linktable.c menu.c test.c -m32 -static –lpthread
cd ../rootfs
cp ../menu/init ./
find . | cpio -o -Hnewc |gzip -9 > ../rootfs.img

报这个错在命令行输入:apt install gcc-multilib就行了:

1
fatal error: bits/libc-header-start.h: 没有那个文件或目录

外事具备!接下来就是启动它了:

1
qemu-system-x86_64 -kernel linux-3.18.6/arch/x86/boot/bzImage -initrd rootfs.img -append "console=ttyS0" -nographic

上面命令的解释:

1
2
3
4
5
qemu-system-x86_64 		 #qemu的system模式进行全量模拟,架构为x64
-kernel #指定内核镜像的位置
-initrd #根文件系统的位置
-append "console=ttyS0" #启动后传入的参数
-nographic #在本地终端启动

之后就可以看到menuOS启动起来了!虽然这个比较顺利但还是泪目了:

但是此处的menuOS是不包含调试信息的,需要重新编译让它包含调试信息,我们进到linux-3.18.6文件里面输入make menuconfig 会进入下面的页面

根据以下路径修改使得编译的时候附上调试信息:

kernel hacking —> Compile-time checks and compiler options -> compile the kernel with debug info(对它按y就能打开调试信息)

之后再make就可以重新编译啦!

又是一段漫长的时光….

开始调试

使用 gdb 跟踪调试内核,加两个参数,一个是-s(在 1234 端口上创建了一个 gdb-server, 读者可以另外打开一个窗口,用 gdb 把带有符号表的内核镜像加载进来,然后连接 gdb-server,设置断点跟踪内核。若不想使用 1234 端口,可以使用-gdb tcp:xxxx 来取代-s 选项), 另一个是-S(CPU 初始化之前冻结起来)

在之前的命令当中加上-S -s参数就可以让内核停下来等待连接:

1
qemu-system-x86_64 -kernel linux-3.18.6/arch/x86/boot/bzImage -initrd rootfs.img -append "console=ttyS0" -nographic -S -s

之后就能用gdb连上了:

一连接发现报错了,仔细一看是架构出现了问题,set architecture i386:x86-64即可:

1
2
3
4
5
pwndbg> target remote:1234
Remote debugging using :1234
warning: Selected architecture i386 is not compatible with reported target architecture i386:x86-64
warning: Architecture rejected target-supplied description
Remote 'g' packet reply is too long (expected 312 bytes, got 608 bytes): 000000000000000000000000000000000000000000000000b10f060000000000000000000000000000000000000000000000000000000000000000000000000000000000000000000000000000000000000000000000000000000000000000000000000000000000000000000000000000000000000000000000000000000000f0ff0000000000000200000000f00000000000000000000000000000000000000000000000000000000000000000000000000000000000000000000010000060000000000000000000000000000000000000000000000000000000000000000000000000000000000000000000000000000000000000000000000000000000000000000000000000000000000000000000000000000000000000000000000000000000000000000000000000000000000000000000000000000000007f0300000000000000000000000000000000000000000000000000000000000000000000000000000000000000000000000000000000000000000000000000000000000000000000000000000000000000000000000000000000000000000000000000000000000000000000000000000000000000000000000000000000000000000000000000000000000000000000000000000000000000000000000000000000000000000000000000000000000000000000000000000000000000000000000000000000000000000000000000000000000000000000000000000000000000000000000000000000000000000000000000000000000000000000000000000000000000000000000000000000000000000000000000000000000000000000801f0000

这里还看到一些很奇怪的玩意:i386:x86-64其实就是x64,名字不同罢了,i386:x86-64:intel估摸着应该是汇编的格式不同,但这个就很离谱了,i386:x64-32,惊奇!!!x64居然还有32位的:

1
2
pwndbg> set architecture 
Requires an argument. Valid arguments are i386, i386:x86-64, i386:x64-32, i8086, i386:intel, i386:x86-64:intel, i386:x64-32:intel, i386:nacl, i386:x86-64:nacl, i386:x64-32:nacl, auto.

其实就是为了节省内存所衍生出来的产物,但好像不太常见,至少现在没见过….

寄存器是 64 位的,但指针只有 32 位,在大量指针的工作流中节省了大量内存。它还确保所有其他仅 64 位处理器功能可用。

再次连接就进入了调试界面,可以看到此处第一条指令是0xfff0

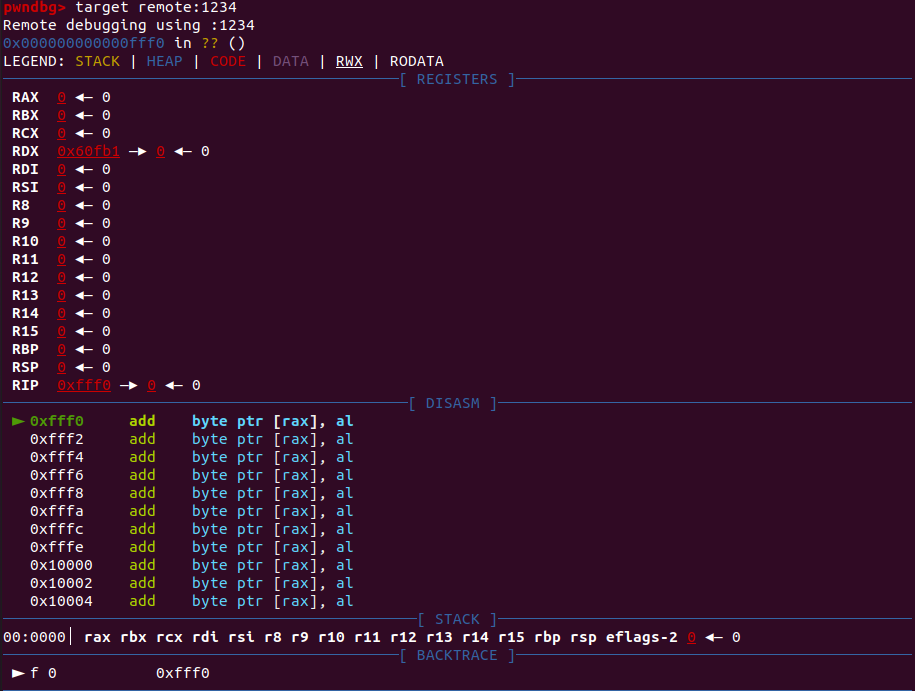
至此就可以正常的进行调试了,接下来将展现linux操作系统启动的方方面面,看到这里,你可能会疑惑为什么是从start_kernel开始调试,你可能会说它就是内核的起点,一切的一切都从这里开始,说的对,但也不对,因为如果说一切的一切都从这里开始的话,那进入start_kernel的栈是哪里来的?断点打在start_kernel上按下c的时候为什么处在冻结状态的内核会闪过一些字符?所以它并不是一切的起点,再次之前还有很多用汇编编写的代码来完成硬件系统的初始化工作,为 C 代码的运行设置环境,那为啥还是得从start_kernel开始调试呢?因为之前都是硬件层面的初始化,在这我们真正想研究或者说想弄明白的是如此庞大的操作系统到底是怎么样启动起来的!并且在这留下几个问题:

  • idle进程是什么,它是怎么来的,它的作用是什么?
  • 0号进程是什么?1号呢?2号呢?1号进程和2号进程的作用又是什么呢?
  • 内核启动完成以后处于一个什么状态当中?

下面是它的源码,可以看到有很多初始化,包括trap_init(中断向量的初始化),mm_init (内存管理模块的初始化)等等….只能选择几个比较重要的来分析并解决上面的问题(毕竟能力有限很多东西还得再沉淀沉淀才能搞明白)

1
2
3
4
5
6
7
8
9
10
11
12
13
14
15
16
17
18
19
20
21
22
23
24
25
26
27
28
29
30
31
32
33
34
35
36
37
38
39
40
41
42
43
44
45
46
47
48
49
50
51
52
53
54
55
56
57
58
59
60
61
62
63
64
65
66
67
68
69
70
71
72
73
74
75
76
77
78
79
80
81
82
83
84
85
86
87
88
89
90
91
92
93
94
95
96
97
98
99
100
101
102
103
104
105
106
107
108
109
110
111
112
113
114
115
116
117
118
119
120
121
122
123
124
125
126
127
128
129
130
131
132
133
134
135
136
137
138
139
140
141
142
143
144
145
146
147
148
149
150
151
152
153
154
155
156
157
158
159
160
asmlinkage __visible void __init start_kernel(void)
{
lockdep_init();//检查内核死锁问题
set_task_stack_end_magic(&init_task);//给栈底加个标志防止溢出
smp_setup_processor_id();//获取CPU硬件ID
debug_objects_early_init();

boot_init_stack_canary();//初始化canary
cgroup_init_early();
local_irq_disable();//关闭IRQ中断
early_boot_irqs_disabled = true;

boot_cpu_init();//激活BOOT CPU
page_address_init();
pr_notice("%s", linux_banner);//打印系统内核的一些信息
setup_arch(&command_line);
mm_init_cpumask(&init_mm);
setup_command_line(command_line);
setup_nr_cpu_ids();
setup_per_cpu_areas();
smp_prepare_boot_cpu(); /* arch-specific boot-cpu hooks */

build_all_zonelists(NULL, NULL);
page_alloc_init();

pr_notice("Kernel command line: %s\n", boot_command_line);
parse_early_param();
after_dashes = parse_args("Booting kernel",
static_command_line, __start___param,
__stop___param - __start___param,
-1, -1, &unknown_bootoption);
if (!IS_ERR_OR_NULL(after_dashes))
parse_args("Setting init args", after_dashes, NULL, 0, -1, -1,
set_init_arg);

jump_label_init();

/*
* These use large bootmem allocations and must precede
* kmem_cache_init()
*/
setup_log_buf(0);
pidhash_init();
vfs_caches_init_early();
sort_main_extable();//对内核异常表进行排序
trap_init();
mm_init();

/*
* Set up the scheduler prior starting any interrupts (such as the
* timer interrupt). Full topology setup happens at smp_init()
* time - but meanwhile we still have a functioning scheduler.
*/
sched_init();
/*
* Disable preemption - early bootup scheduling is extremely
* fragile until we cpu_idle() for the first time.
*/
preempt_disable();
if (WARN(!irqs_disabled(),
"Interrupts were enabled *very* early, fixing it\n"))
local_irq_disable();
idr_init_cache();
rcu_init();
context_tracking_init();
radix_tree_init();
/* init some links before init_ISA_irqs() */
early_irq_init();
init_IRQ();
tick_init();
rcu_init_nohz();
init_timers();
hrtimers_init();
softirq_init();
timekeeping_init();
time_init();
sched_clock_postinit();
perf_event_init();
profile_init();
call_function_init();
WARN(!irqs_disabled(), "Interrupts were enabled early\n");
early_boot_irqs_disabled = false;
local_irq_enable();

kmem_cache_init_late();

/*
* HACK ALERT! This is early. We're enabling the console before
* we've done PCI setups etc, and console_init() must be aware of
* this. But we do want output early, in case something goes wrong.
*/
console_init();
if (panic_later)
panic("Too many boot %s vars at `%s'", panic_later,
panic_param);

lockdep_info();

locking_selftest();

#ifdef CONFIG_BLK_DEV_INITRD
if (initrd_start && !initrd_below_start_ok &&
page_to_pfn(virt_to_page((void *)initrd_start)) < min_low_pfn) {
pr_crit("initrd overwritten (0x%08lx < 0x%08lx) - disabling it.\n",
page_to_pfn(virt_to_page((void *)initrd_start)),
min_low_pfn);
initrd_start = 0;
}
#endif
page_cgroup_init();
debug_objects_mem_init();
kmemleak_init();
setup_per_cpu_pageset();
numa_policy_init();
if (late_time_init)
late_time_init();
sched_clock_init();
calibrate_delay();
pidmap_init();
anon_vma_init();
acpi_early_init();
#ifdef CONFIG_X86
if (efi_enabled(EFI_RUNTIME_SERVICES))
efi_enter_virtual_mode();
#endif
#ifdef CONFIG_X86_ESPFIX64
/* Should be run before the first non-init thread is created */
init_espfix_bsp();
#endif
thread_info_cache_init();
cred_init();
fork_init(totalram_pages);
proc_caches_init();
buffer_init();
key_init();
security_init();
dbg_late_init();
vfs_caches_init(totalram_pages);
signals_init();
/* rootfs populating might need page-writeback */
page_writeback_init();
proc_root_init();
cgroup_init();
cpuset_init();
taskstats_init_early();
delayacct_init();

check_bugs();

sfi_init_late();

if (efi_enabled(EFI_RUNTIME_SERVICES)) {
efi_late_init();
efi_free_boot_services();
}

ftrace_init();
/* Do the rest non-__init'ed, we're now alive */
rest_init();
}

start_kernel处下断点之后c就断下来了,可以从pwngdb里面看到此时的堆栈已经初始化好了,这里应该是进程内核栈:

init_task

最最最开始的部分就是下面这个部分,当我进入的时候lockdep_init()已经完成了,我不信邪,重新开始想要再它那下断点,发现它并没有lockdep_init这个符号:

1
2
lockdep_init();
set_task_stack_end_magic(&init_task);

简单看一下它的源码,首先检查lockdep_init是否被初始化过(它只需要初始化一次),之后就是生成了两个哈希的链表,插入自己的一个想法:如果它没有检查lockdep_init是否被初始化,是不是可以再一次进行初始化然后控制我们的这个链表上内容进行一下伪造呢?(突发奇想,大师傅莫怪),关于死锁检测的原理看下面的文章:

死锁检测lockdep实现原理

1
2
3
4
5
6
7
8
9
10
11
12
13
14
15
void lockdep_init(void)
{
int i;

if (lockdep_initialized)
return;

for (i = 0; i < CLASSHASH_SIZE; i++)
INIT_LIST_HEAD(classhash_table + i);

for (i = 0; i < CHAINHASH_SIZE; i++)
INIT_LIST_HEAD(chainhash_table + i);

lockdep_initialized = 1;
}

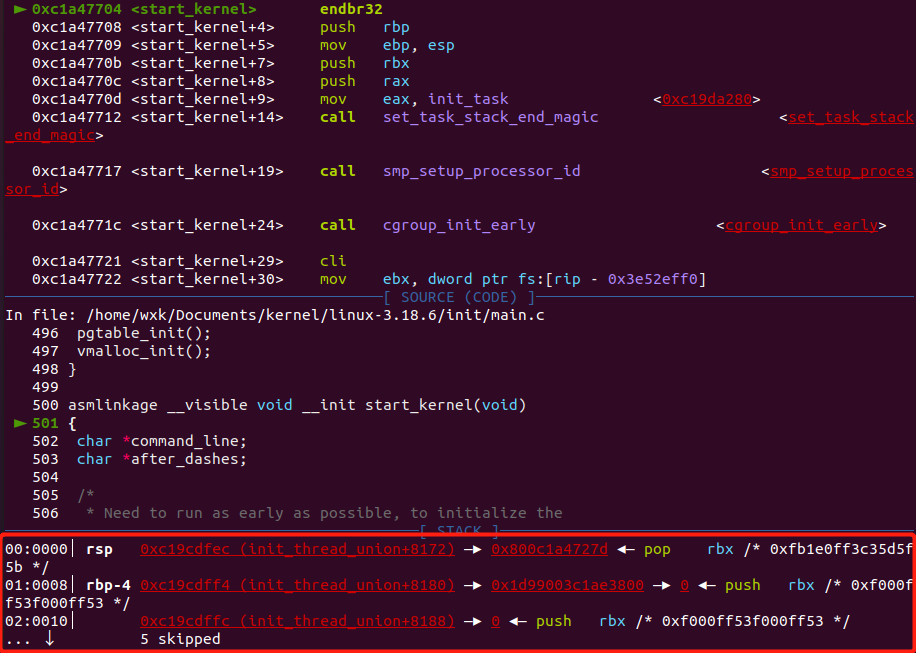
在源码中会有Need to run as early as possible, to initialize the lockdep hash这条注释,翻译过来就是说lockdep_init需要尽可能的最早运行,为什么呢?其实往下看下一条指令(set_task_stack_end_magic(&init_task))就知道了,步入之后它就去fork.c了,但此进程并不是fork出来的,回过头看它初始化死锁也是挺有道理的,回头想想这岂不是第一个进程?答案确实是的!

可以看出 init_task(0 号进程)是task_struct类型,是进程描述符, 使用宏 INIT_TASK 对其进行初始化。

刚开始看看它的源码也是挺奇怪的,它的目的是防止溢出?它在stack的末尾放了一个STACK_END_MAGIC的标志,栈溢出不是有canary来保护吗,为什么要两个玩意儿来保护,其实这两个有着本质的区别,canary是保护返回地址不被覆盖,而此处的STACK_END_MAGIC是保护栈的底部,防止有些恶意的数据向内存中的其他地方蔓延,此处也证明了它再进入start_kernel的时候已经初始化好了栈:

start_kernel 分析 —— set_task_stack_end_magic

1
2
3
4
5
6
7
8
9
#define STACK_END_MAGIC		0x57AC6E9D

void set_task_stack_end_magic(struct task_struct *tsk)
{
unsigned long *stackend;

stackend = end_of_stack(tsk);
*stackend = STACK_END_MAGIC;/* for overflow detection */
}

boot_init_stack_canary

下面才是canary的初始化:

1
boot_init_stack_canary();

熟悉PWN的选手对于canary可能都不会太陌生,这里就稍微介绍一下,利用random+tsc的模式来生成随机数,为啥要用两个来生成呢?答案很明显就是增加随机性嘛!然后写入到idle进程的task_struct->stack_canary中里面(这个是啥等会再说),同时还得写到CPU里面去:

时间戳计数器 TSC

从Linux内核中获取真随机数

1
2
3
4
5
6
7
8
9
10
11
12
13
14
15
16
17
18
19
static __always_inline void boot_init_stack_canary(void)
{
u64 canary;
u64 tsc;

#ifdef CONFIG_X86_64
BUILD_BUG_ON(offsetof(union irq_stack_union, stack_canary) != 40);
#endif
get_random_bytes(&canary, sizeof(canary));
tsc = __native_read_tsc();
canary += tsc + (tsc << 32UL);

current->stack_canary = canary;
#ifdef CONFIG_X86_64
this_cpu_write(irq_stack_union.stack_canary, canary);
#else
this_cpu_write(stack_canary.canary, canary);
#endif
}

cgroup_init_early

cgroup为进程的行为控制,cgroup_init_early做数据结构和其中链表的初始化,有个博主写的够详细了:

从cgroup_init_early函数学习cgroup——初始化代码

从cgroup_init_early函数学习cgroup——框架

1
cgroup_init_early();

在后面的初始CPU的过程

1
2
local_irq_disable();	
local_irq_enable();

boot_cpu_init

boot_cpu_init是去启动boot CPU的:

1
2
3
4
5
6
7
8
9
static void __init boot_cpu_init(void)
{
int cpu = smp_processor_id();
/* Mark the boot cpu "present", "online" etc for SMP and UP case */
set_cpu_online(cpu, true);
set_cpu_active(cpu, true);
set_cpu_present(cpu, true);
set_cpu_possible(cpu, true);
}

trap_init

初始化中断向量表也是很重要的一个函数,毕竟中断是计算机当中的三大法宝之一😁

1
trap_init();

下面是它的源码,看着挺长但总共也就四个函数分别是set_trap_gateset_system_gatecoutb

  • set_trap_gate

这个很好理解,就是设置中断向量表,看的到0号中断,1号中断…,这些在学习汇编的时候都有涉及到

Linux0.11版本的set_trap_gate宏分析

  • set_system_gate

设置系统的中断向量表,和上面的一样

1
2
3
4
5
6
7
8
9
10
11
12
13
14
15
16
17
18
19
20
21
22
23
24
25
26
27
28
void trap_init(void)
{
int i;
//设置系统的硬件中断 中断位于kernel/asm.s 或 system_call.s
set_trap_gate(0,÷_error);//0中断,位于/kernel/asm.s 19行
set_trap_gate(1,&debug);
set_trap_gate(2,&nmi);
set_system_gate(3,&int3); /* int3-5 can be called from all */
set_system_gate(4,&overflow);
set_system_gate(5,&bounds);
set_trap_gate(6,&invalid_op);
set_trap_gate(7,&device_not_available);
set_trap_gate(8,&double_fault);
set_trap_gate(9,&coprocessor_segment_overrun);
set_trap_gate(10,&invalid_TSS);
set_trap_gate(11,&segment_not_present);
set_trap_gate(12,&stack_segment);
set_trap_gate(13,&general_protection);
set_trap_gate(14,&page_fault);
set_trap_gate(15,&reserved);
set_trap_gate(16,&coprocessor_error);
for (i=17;i<48;i++)
set_trap_gate(i,&reserved);
set_trap_gate(45,&irq13);
outb_p(inb_p(0x21)&0xfb,0x21);//设置CPU电平
outb(inb_p(0xA1)&0xdf,0xA1);
set_trap_gate(39,&parallel_interrupt);
}

rest_init

完成之前的初始之后就进入了一个很关键的函数rest_init();,此函数在linux-3.18.6/init/main.c,下面就是它的源码,此函数完成以后,内核的初始化工作就已经全部完成,接下来看看它到底做了什么工作:

1
2
3
4
5
6
7
8
9
10
11
12
13
14
15
16
17
18
19
20
21
22
23
24
25
26
27
static noinline void __init_refok rest_init(void)
{
int pid;

rcu_scheduler_starting();
/*
* We need to spawn init first so that it obtains pid 1, however
* the init task will end up wanting to create kthreads, which, if
* we schedule it before we create kthreadd, will OOPS.
*/
kernel_thread(kernel_init, NULL, CLONE_FS);
numa_default_policy();
pid = kernel_thread(kthreadd, NULL, CLONE_FS | CLONE_FILES);
rcu_read_lock();
kthreadd_task = find_task_by_pid_ns(pid, &init_pid_ns);
rcu_read_unlock();
complete(&kthreadd_done);

/*
* The boot idle thread must execute schedule()
* at least once to get things moving:
*/
init_idle_bootup_task(current);
schedule_preempt_disabled();
/* Call into cpu_idle with preempt disabled */
cpu_startup_entry(CPUHP_ONLINE);
}

此函数之所以重要,是因为它创建了两个线程,分别是kernel_initkthreadd,也就是说从开始的init_task之后又创建了两个线程,终于碰到了开头说到的1号进程和2号进程:

1
2
kernel_thread(kernel_init, NULL, CLONE_FS);
pid = kernel_thread(kthreadd, NULL, CLONE_FS | CLONE_FILES);

kernel_thread是通过do_fork来启动一个内核线程,线程的开启是根据int (*fn)(void *)这个函数指针来调用的,每个标志的含义见下面的链接:

_do_fork函数源码解析

1
2
3
4
5
pid_t kernel_thread(int (*fn)(void *), void *arg, unsigned long flags)
{
return do_fork(flags|CLONE_VM|CLONE_UNTRACED, (unsigned long)fn,
(unsigned long)arg, NULL, NULL);
}
kernel_init

现在就开始进入到kernel_initkthreadd里面来看看它俩到底做了什么,首先是kernel_init,其实它还有个别名叫init进程,没错,它就是用户态进程的开端,所有的进程都是间接或直接由它生成的,但是之前听到的init进程都是再用户态程序当中的,而此处的init是处于内核当中的,所以此函数肯定存在从内核态转向用户态的过程:

1
2
3
4
5
6
7
8
9
10
11
12
13
14
15
16
17
18
19
20
21
22
23
24
25
26
27
28
29
30
31
32
33
34
35
36
37
38
39
40
41
42
43
44
static int __ref kernel_init(void *unused)
{
int ret;

kernel_init_freeable();
/* need to finish all async __init code before freeing the memory */
async_synchronize_full();
free_initmem();
mark_rodata_ro();
system_state = SYSTEM_RUNNING;
numa_default_policy();

flush_delayed_fput();

if (ramdisk_execute_command) {
ret = run_init_process(ramdisk_execute_command);
if (!ret)
return 0;
pr_err("Failed to execute %s (error %d)\n",
ramdisk_execute_command, ret);
}

/*
* We try each of these until one succeeds.
*
* The Bourne shell can be used instead of init if we are
* trying to recover a really broken machine.
*/
if (execute_command) {
ret = run_init_process(execute_command);
if (!ret)
return 0;
pr_err("Failed to execute %s (error %d). Attempting defaults...\n",
execute_command, ret);
}
if (!try_to_run_init_process("/sbin/init") ||
!try_to_run_init_process("/etc/init") ||
!try_to_run_init_process("/bin/init") ||
!try_to_run_init_process("/bin/sh"))
return 0;

panic("No working init found. Try passing init= option to kernel. "
"See Linux Documentation/init.txt for guidance.");
}

那它是怎么转换的呢?答:直接去用户态进程找到一个init进程并启动它,要找到用户态进程那首先就得挂载文件系统吧:

1
2
3
4
5
6
if (ramdisk_execute_command) {
ret = run_init_process(ramdisk_execute_command);
if (!ret)
return 0;
pr_err("Failed to execute %s (error %d)\n",ramdisk_execute_command, ret);
}

挂载完成之后,如果在命令行中有指定init的程序就去执行这个,如果没有就去一些固定的目录去找:

1
2
3
4
5
6
7
if (execute_command) {
ret = run_init_process(execute_command);
if (!ret)
return 0;
pr_err("Failed to execute %s (error %d). Attempting defaults...\n",
execute_command, ret);
}

开始寻找用户态的文件系统中的init进程,只要这四个只要一个就可以了:

1
2
3
4
5
if (!try_to_run_init_process("/sbin/init") ||
!try_to_run_init_process("/etc/init") ||
!try_to_run_init_process("/bin/init") ||
!try_to_run_init_process("/bin/sh"))
return 0;
kthreadd

kthreadd的本地就是运行在内核态的死循环,它会不断遍历kthread_create_list来查看是否有需要创建的线程,这个进程是linux内核的守护进程,它的作用是管理调度其他内核进程

1
2
3
4
5
6
7
8
9
10
11
12
13
14
15
16
17
18
19
20
21
22
23
24
25
26
27
28
29
30
31
32
33
34
35
36
37
38
39
40
41
42
43
44
45
int kthreadd(void *unused)
{
struct task_struct *tsk = current;

/* Setup a clean context for our children to inherit. */
set_task_comm(tsk, "kthreadd");
ignore_signals(tsk);
set_cpus_allowed_ptr(tsk, cpu_all_mask);//运行kthreadd在任意CPU运行
set_mems_allowed(node_states[N_MEMORY]);

current->flags |= PF_NOFREEZE;
cgroup_init_kthreadd();

for (;;) {
//设置当前进程状态为TASK_INTERRUPTIBLE,
set_current_state(TASK_INTERRUPTIBLE);
//查找kthread_create_list列表中 是否有新需创建的线程,如果没有让出CPU,进入睡眠
if (list_empty(&kthread_create_list))
schedule();
//如果有要创建的线程,设置当前进程状态为TASK_INTERRUPTIBLE 运行态
__set_current_state(TASK_RUNNING);
//spin_lock自旋锁,不可睡眠
spin_lock(&kthread_create_lock);
//查找kthread_create_list列表
while (!list_empty(&kthread_create_list)) {
//kthread_info
struct kthread_create_info *create;
//从kthread_create_list中取出要创建线程的信息
create = list_entry(kthread_create_list.next,
struct kthread_create_info, list);
//从列表中删除要创建的线程
list_del_init(&create->list);
//spin_unlock 解锁
spin_unlock(&kthread_create_lock);
//创建线程
create_kthread(create);
//spin_lock自旋锁,不可睡眠
spin_lock(&kthread_create_lock);
}
//spin_unlock 解锁
spin_unlock(&kthread_create_lock);
}

return 0;
}

总结

自此回看之前的问题,再总结一下:

  • idle进程是什么,它是怎么来的,它的作用是什么?

idle进程其实就是start_kernel最开始创建的进程—-init_task,通过cpu_idle()函数将init_task转化成idle进程,其实就是0号进程在不同时间段中不同的状态

  • 0号进程是什么?1号呢?2号呢?1号进程和2号进程的作用又是什么呢?

0号进程为init_task/idle,1号进程为init进程,2号进程为kthreadd,更详细的介绍可以看看下面的系列:

Android 8.0 开机流程 (一) Linux内核启动过程

Android 8.0 开机流程 (二) Linux 内核kthreadd进程的启动

Android 8.0 开机流程 (三) Linux 内核 init 进程的启动

  • 内核启动完成以后处于一个什么状态当中?

处于一个死循环当中,保证操作系统能正常的运行

参考文章

linux启动流程(从start_kernel中的rest_init函数到init进程(1)

linux内核rest_init分析

start_kernel启动函数——简版

[Linux 3.2.8 内核启动过程](